Login
Login


Step-by-Step Guide to Finding Need-Based Financial Aid
What's more fun than completing your taxes? Filling out the FAFSA, of course! The FAFSA is a source of college scholarships, and it must be completed by college-bound seniors and their parents. So, if your child is headed to college, complete the FAFSA during October of senior year.
The FAFSA changes over time and some may find it easier to complete than in years past, but certainly not more fun. Here are nine simple steps for getting it done.
There are three things you need to know about the process before you get started.
1. Start the FAFSA October 1st
October should now be known as the month you have to fill out the FAFSA. Don't delay! In order to get the best financial aid available to you, fill out this form as soon as possible after October 1st. Plan to fill it out every year from senior year in high school until your student is finished with college.
2. Use Last Year’s Tax Return
Instead of estimating taxes, you will use last year’s tax returns. The tax return you use to fill out the FAFSA is the most recent federal tax return you filed. For example, in October of 2016, use your tax returns from 2015.
3. Collect Your Documents
In order to fill out the FAFSA, you will need:
- Your Social Security Number
- Your most recent federal income tax returns, W-2s, and any other records of money earned
- Bank statements and records of investments (if applicable)
- Records of untaxed income (if applicable)
An FSA ID to sign the form electronically. If you don't have an ID, you will be given the option to register for one at the end of the process, before you are able to sign electronically. (NOTE: Your student needs one too). You can register for an FSA ID prior to beginning here.

Step 1 - The Process
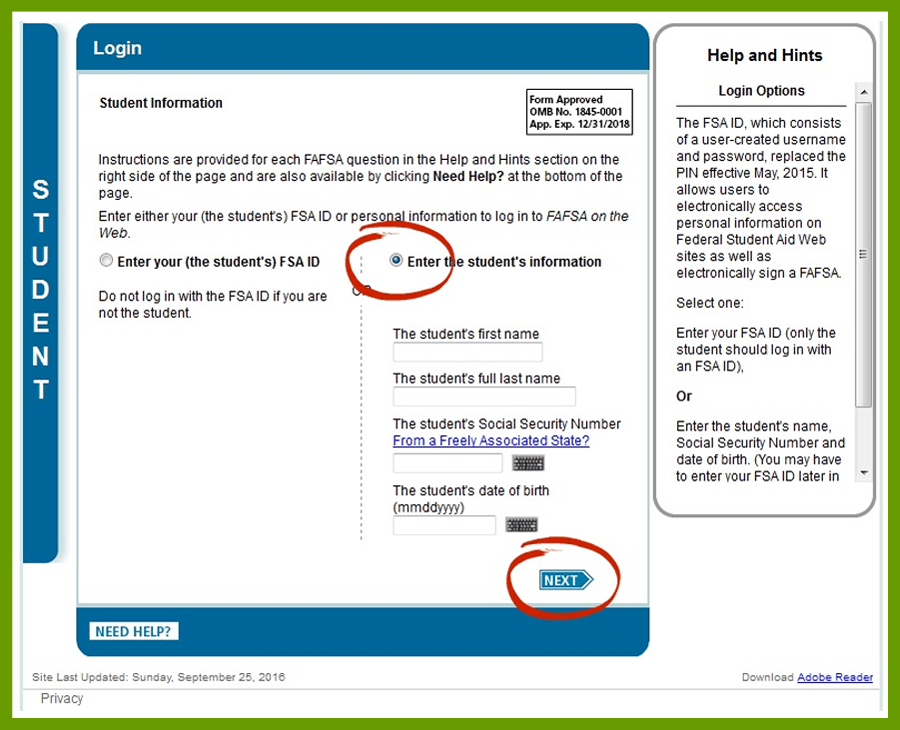
Step 2 - Get Started
Once you have confirmed the information is correct, you will be taken to a page that asks which year you are applying for aid. Click the year you are applying for. You will be asked to "Create a Save Key." This is a numeric password used in case you need to come back to finish, or to log back in if you leave your screen for 10 minutes or more. Click the “Next” arrow.
The next page is an introduction page with FAQs. There is helpful information here, so spend a second or two reading it over. Each blue link is clickable. After you finish reading, click the “Next” arrow to move on.
Step 3 - Student Demographic Section
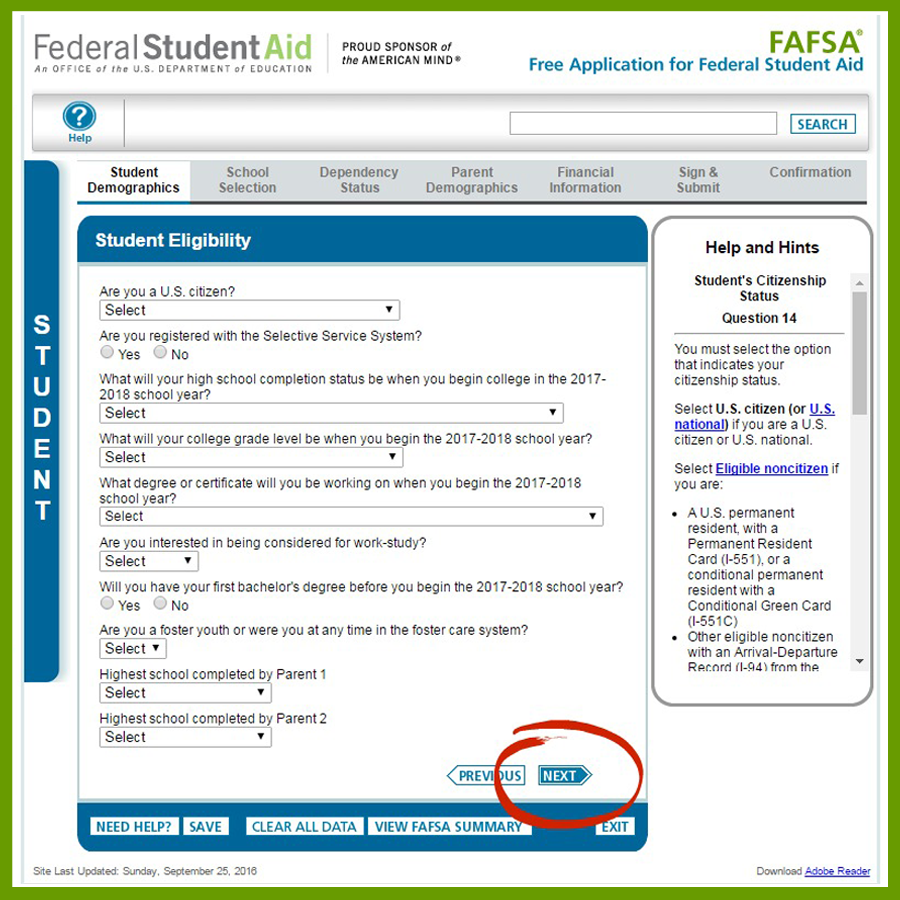
Now, here’s where we get into the nitty-gritty of the FAFSA. First is the student section. (Don't worry parents ... your turn is coming!) The first page of this section is fairly straightforward, asking for mailing address, phone number, email, etc. After you have filled this out, click the “Next” arrow. Student Eligibility comes next. Still nothing too difficult here. Fairly straightforward.
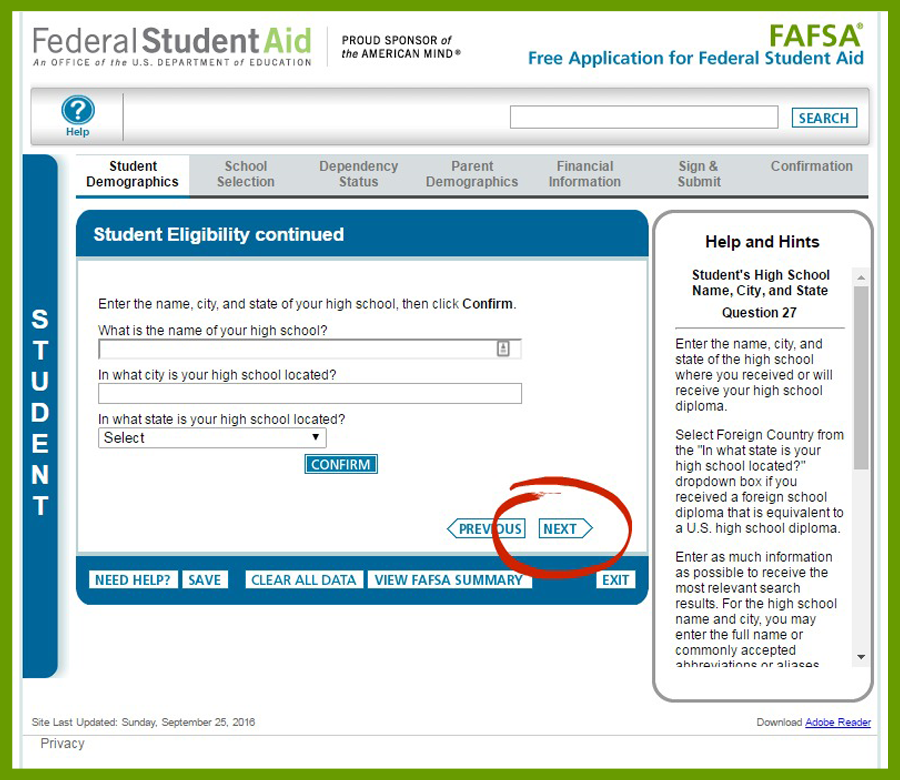
There are two sections in Student Eligibility. The second section asks for the name of your student's high school. No need to be formal or fancy here, simply type "homeschool,” fill in the city and state, and confirm. After hitting the “confirm” button, a list of high school choices will pop up at the bottom. Homeschool will not be listed, simply click the “Next” arrow.
UPDATE (2017): With a new FAFSA year came changes to the FAFSA, of course. Question 26 is confusing because it asks if your student has a High school diploma, a GED®, or Home schooled. Obviously, two answers are true - they have a diploma AND are homeschooled. "Homeschooled" should be selected, according to HSLDA.
HSLDA states, "Students graduating with a homeschool diploma in compliance with their state’s homeschool law should choose “homeschooled” for this question. Using the “homeschooled” choice, you will not need to enter a private or public school code. Click here for more details.
Step 4 - School Selection
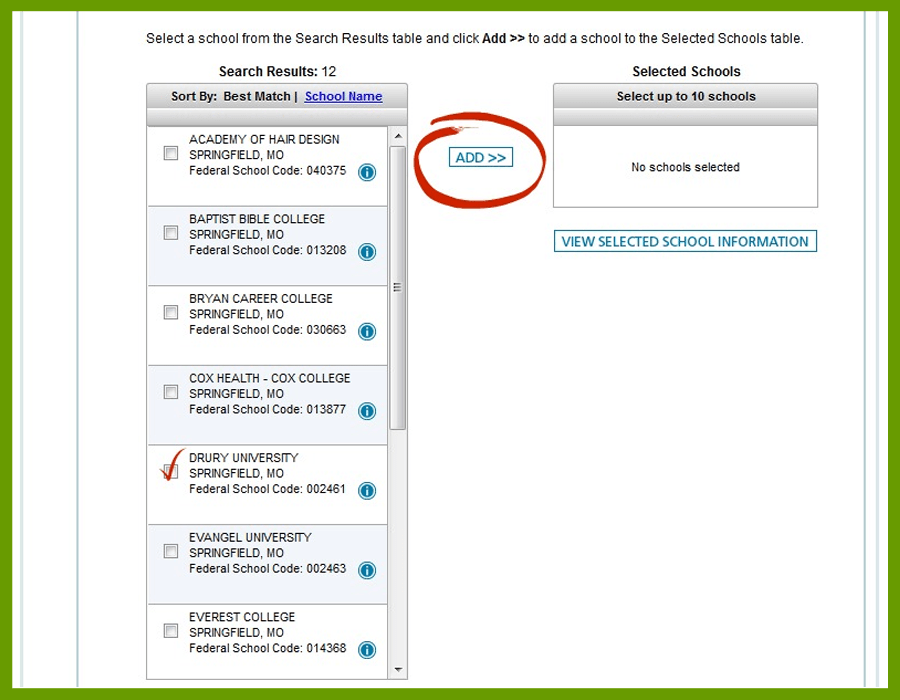
On this screen, you will see a couple of boxes at the top alerting you that your student may be eligible for student aid and that the application was successfully saved (hopefully!). That's good! If you don't see these boxes, you will have to go back and fix whatever didn't go quite right the first time. Here, you'll add the schools where you want to direct your financial aid. You can list up to 10, either by searching their state, city, or school name. Alternatively, if you know the school's federal school code, you can enter it.
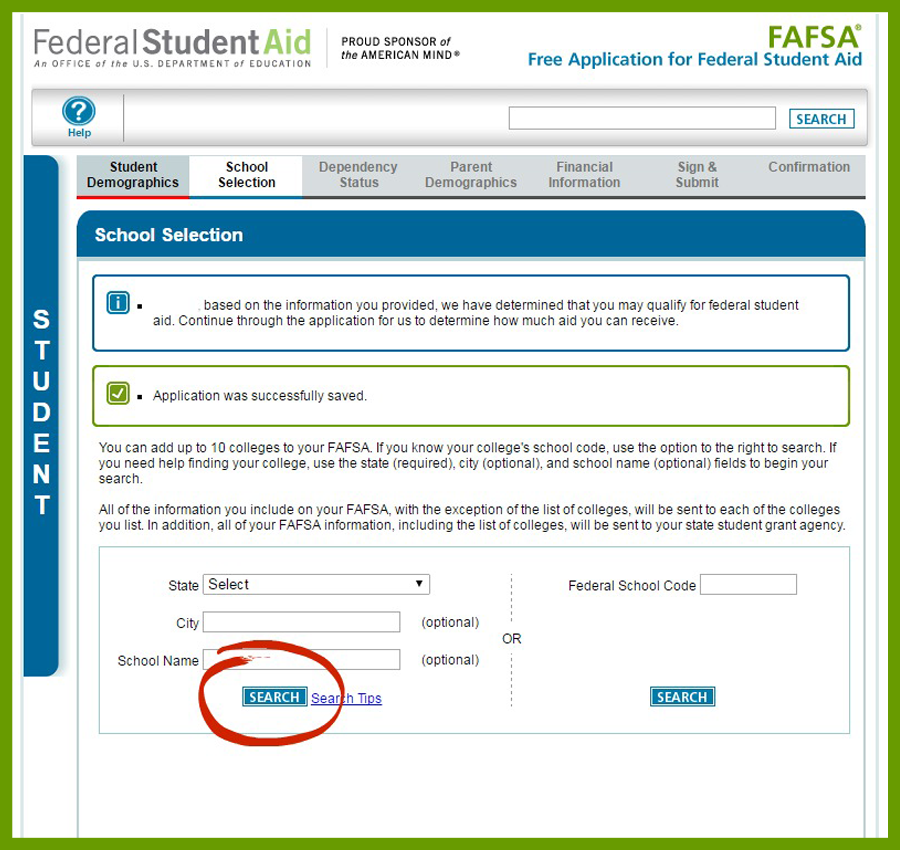
Once you search for a school, a list of colleges (only one if you entered a code or a specific name) will come up. Click on the box to the left of the school you want to receive your information and click “Add.” The school information will be automatically entered in the box on the right of the screen. When you see it there, click the “Next” arrow.
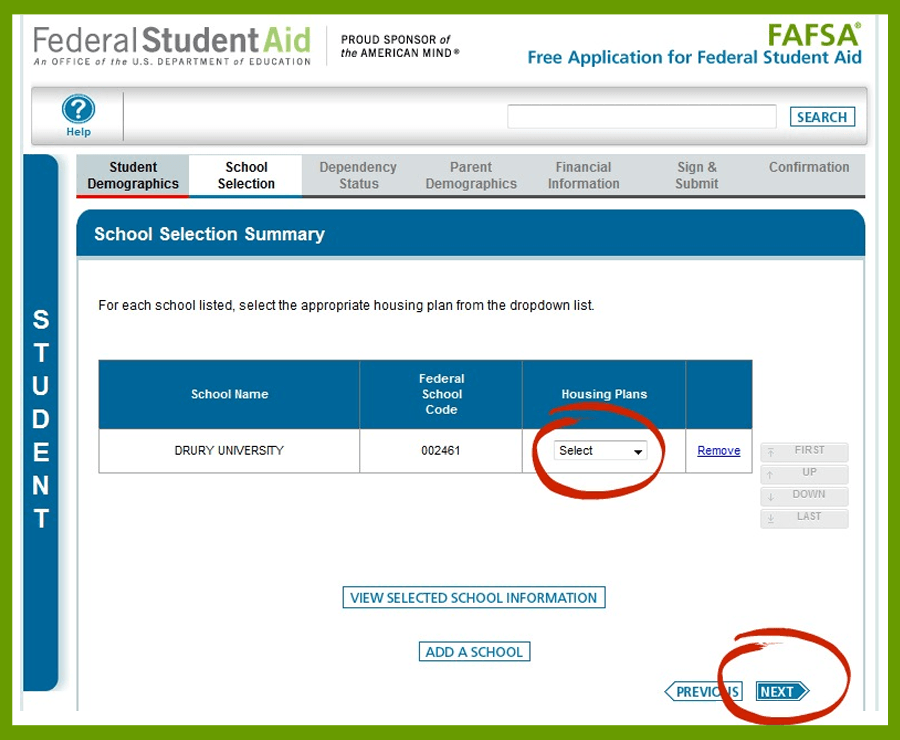
The next page allows you the opportunity to view the selected school information, but is mostly a confirmation that you are happy with the school(s) you have chosen. Don’t forget to select the housing option in the drop down box. You still have the option to add more schools to your list if you haven't already used all 10 spaces allotted for school choices. Click the “Next” arrow.
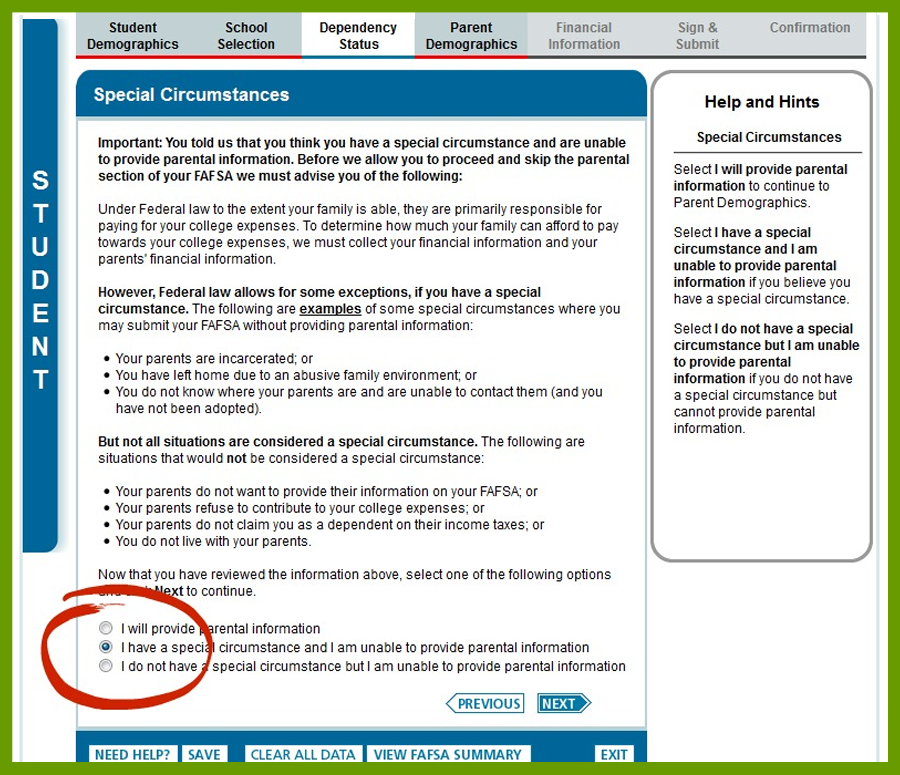
Step 5 - Dependency Status
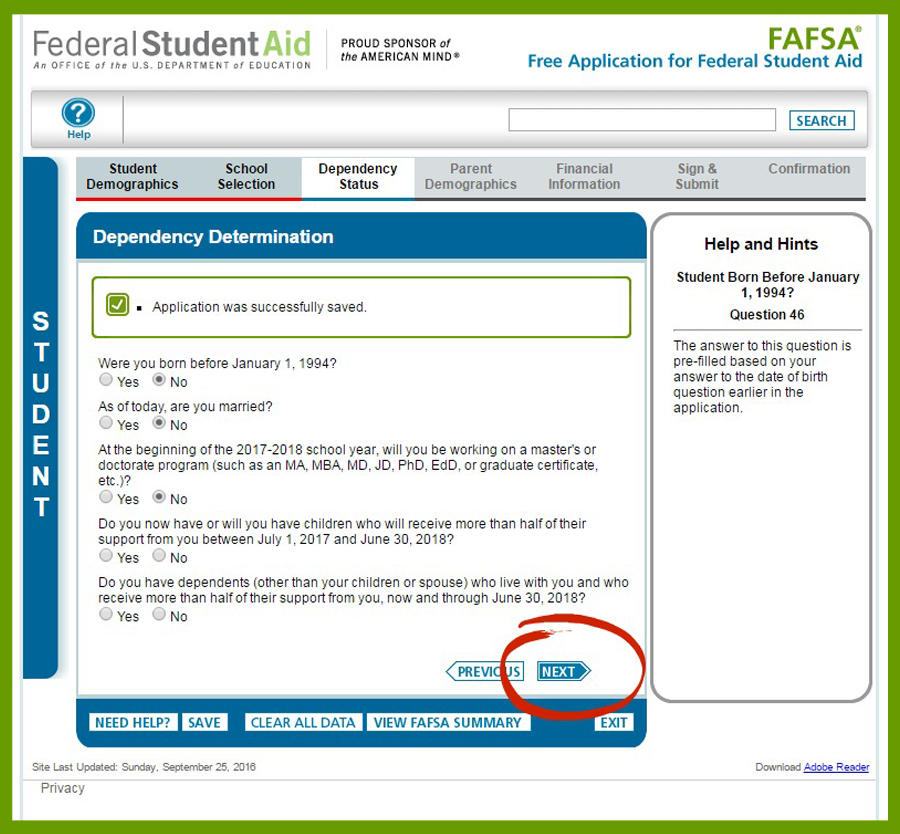
You've reached a new section! Again, you should see a box come up at the top stating your application was successfully saved. If you don't see this statement, you'll need to go fix what went wrong. More straightforward questions ... however, this is one of two pages where more questions will continue to come up as you answer questions, depending upon your answers. Hang in there, and keep answering.
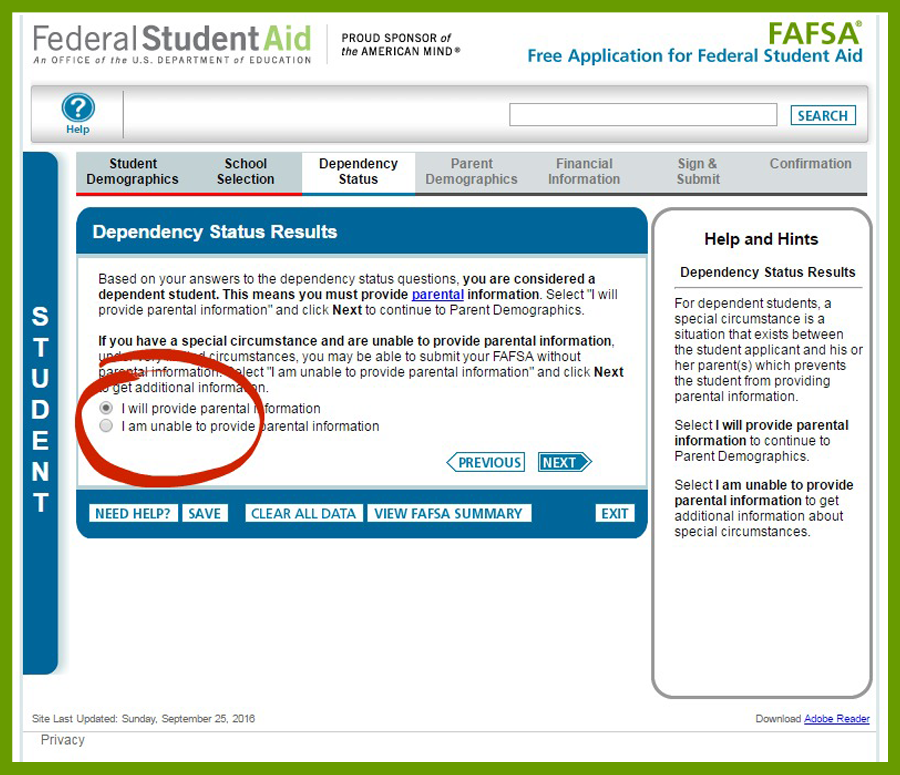
If your student is determined to be a dependent student, you will have to provide parental information through filling out the first part of this form. There are two options on this screen: to provide parental information or not provide parental information. If you choose to provide information, you'll be taken to the Parent Demographics section. If you choose not to provide parental information, you will see a page that explores the "why,” with three options to choose from.
Step 6 - Parent Demographics Information
“Application was successfully saved” should be displayed at the top of the page! If it is, proceed to filling out the requested information. This is a tricky page because the page changes depending on the option you choose for your marital status. For some options, it only asks for single parent information, for other options, it asks for information on both parents.
And, just when you were getting comfortable and thinking this was a breeze, it gets tricky. The next section is the dreaded tax forms.
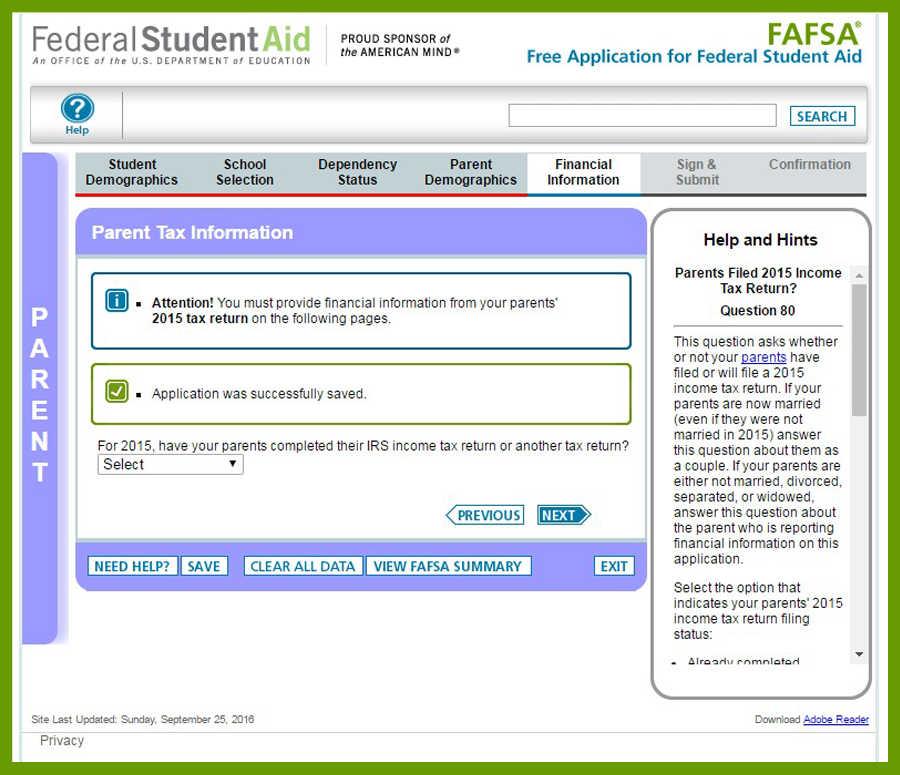
Step 7 - Parent Tax Information
Although some will resist it, there is an option for most people to connect to the IRS site and pull your tax information directly from it. It is much easier to do it this way, but it is understandable if you choose not to. I say, “for most people,” because if you have filed a Form 1040X amended tax return or filed in Puerto Rico in 2015, you cannot link to the IRS.
You do need your FSA ID in order to link to the IRS site. If you choose to link to the IRS site, you'll be asked to fill in your address in order to pull information. It pulls up your name, social security number, date of birth, and filing status automatically, (depending on if you use parent one or parent two's FSA ID). You will also need to click the "Transfer" button at the bottom of the tax information. If you get this far and panic, there is a button for not transferring information as well.
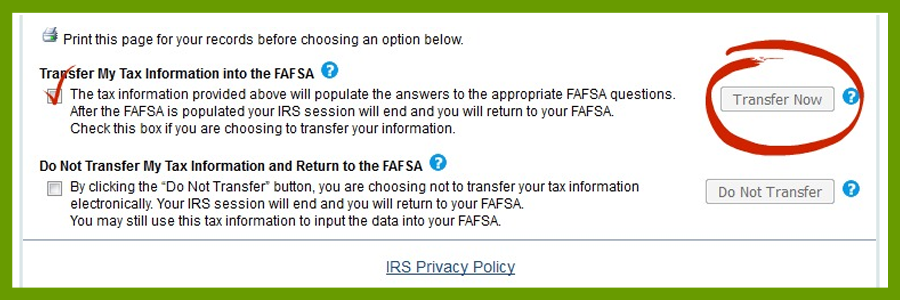
This section can get sticky if you don't link because some of the numbers they want are unclear, especially if you are filling in information for two parents. It can be done, but is the more difficult option. This is the second page that continues to add questions as you answer the previous one.
If you have chosen to transfer your tax information, you will see another box at the top of the screen (once you are transferred back to the FAFSA website) saying you have successfully done so. For this page and the next, you have to trust you can do it! I can't show you screen shots of these due to private financial information.
Step 8 - Student Tax Information
This section is much like the previous section on parent taxes. If your child has worked and received W-2s, then this will definitely apply. If they haven't, you'll be entering many zeroes. Unfortunately, you still have to fill it out.
Much like the parent tax information, you will likely have the option to connect to the IRS site and transfer data from their site. Again, it is the easier option, but if you choose not to for the child, it is easier to fill out the tax information manually in this section.
Fill in the financial information over the next two pages for your student. Hang in there; you're getting close to the end!
Step 9 - Sign & Submit
This is the last section you will need to fill out, and it is the easiest. Remember that FSA ID you made at the beginning? Now you need to pull it out. In order to electronically sign the form and submit it, you'll need this ID. You are encouraged not to sign for your child. They will need to help you make their FSA ID to use as their own electronic signature.
There are two other options for submitting the FAFSA. You can print and mail the signature page or submit it without signatures. The printing and mailing option obviously takes a little longer. Submitting without signatures allows you to submit it if your student isn't around at the time, but you will still have to return later to sign it before it is officially submitted.
Answer the few questions there, read the “Read before proceeding” box, "sign" your name and have your student "sign" their name. After the signatures are complete, click the "Submit my FAFSA now" button. That's it! Now wasn't that easy??
Click to get my free white paper on filling out the FAFSA. I promise you will love it ... the white paper, not the FAFSA: Need Based Scholarships White Paper
In the End ...
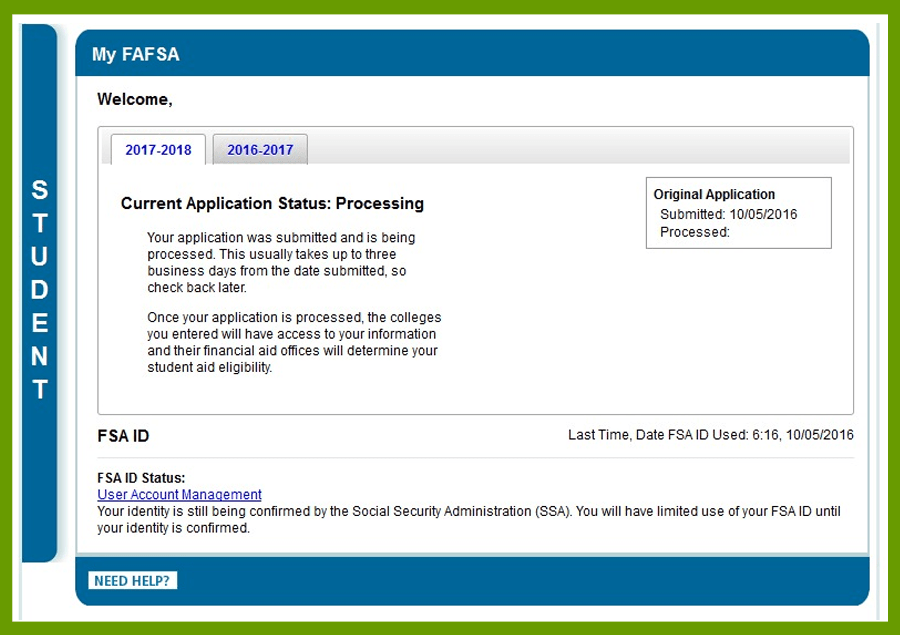
After you submit your FAFSA, you will have the option to print the document on the ending page. It is helpful to print a copy and save a copy on your computer. You will also get an email confirming you have submitted your FAFSA form successfully. If you're curious, about halfway down the email you will find estimated eligibility criteria and, if you have qualified, the amount the government expects you will receive in financial aid. This isn't a definitive answer on your qualification, only an estimate.
After you click the “Exit” button in the bottom right, you will see the final screen.
Here are a couple of tips before I leave you to your computer and FAFSA form.
- If there is a problem throughout the process, the program will tell you. If you click the “Next” button and there is an error, it will not allow you to continue until the error is fixed.
- If you have questions, there is a help box on the right side of each page. You won’t always find the answer you're looking for, but there are answers to general questions.
- There is a "Save" button at the bottom of each page. If you are in the middle of filling out your FAFSA and life happens, don't panic! Save it and come back to it later.
Congratulations! You are now an experienced FAFSA enthusiast! Well, ok, maybe not. But next year when you come back, you'll know exactly what to expect having experienced the process before.

Get More Help on Need Based Scholarships and the FAFSA!
Recommended Resources

Learn how to identify and avoid the big blunders repeated by countless homeschool parents!
The First Mistake may cripple your plans if your child ever changes their mind (and what teenager doesn't!) The Second Mistake may leave your child unprepared for college! The Third Mistake may result in the loss of thousands of dollars in financial aid! The Fourth Mistake may cause your child to be lost in the crowd during college admission. The Fifth Mistake may render your kid unable to gain admission to the college of their dreams!

Most homeschool families have not saved up enough money to pay for their children’s college education, and plan to rely on scholarship money to help defray the cost. Are there concrete steps you can take to increase the odds of your child receiving scholarships? Yes! In this book, Lee Binz reveals secrets to getting big scholarships which you can start to work on right away.
Scholarship money is available for almost every college applicant. Some students will win HUGE merit scholarships, why not yours? Lee Binz was able to help get both of her children four-year full-tuition scholarships to their first choice university and now she brings those secrets to you.

College admissions is extremely competitive! Comprehensive records will set your student apart. The Comprehensive Record Solution is geared for parents who know they need to do more than “just a transcript.” It will enable you to create the transcript, but the focus is directed at much more, such as: course descriptions, reading list, activities and award list, and work samples---all the elements that go into a “comprehensive” record.
With The Comprehensive Record Solution, you will be able to create high school records that win college admission and scholarships, step-by-step training and cut-and-paste simplicity and four document reviews with Lee - so you will know your records are done right!
Amarillo, TX 79106
Phone: 1-888-533-2435
Opening Hours: Monday to Friday: 9.00 am to 03:00 pm (PST)